
Where can a paper band sit without covering a carton barcode?
A narrow carton can look neatly banded from the front while the band crosses the retail barcode on the back. Before ordering a paper banding machine, mark the space the band may occupy on a filled carton. The supplier can then test a measurable position instead of trying to match a photograph by eye.
Go to the two-position sample test · Ask Keepway to review a marked carton
Mark the barcode and the usable lane
Choose the face with the barcode and one physical carton edge as your measurement reference. Mark the entire symbol and its required clear margins as a protected area on a copy of the approved artwork. Check the other faces in the same loop for a tear strip, opening tab, date code or information that must stay visible. Carry each restriction back onto the sketch from the same reference edge.
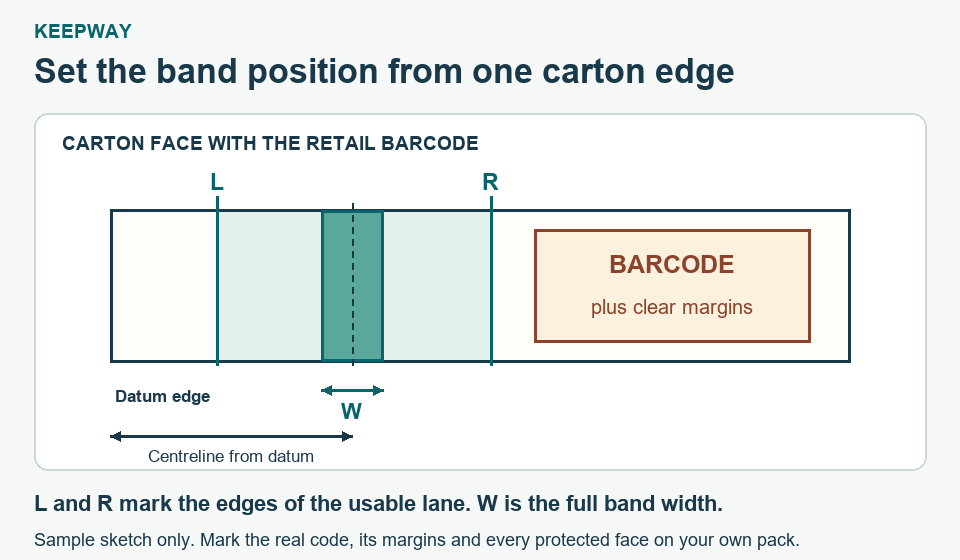
Write L and R beside the left and right edges of one continuous usable lane. Both measurements start at the reference edge. Write W for the actual band width. If the full width cannot fit between L and R, change the proposed route, carton presentation or band specification and review the artwork again.
Translate the lane into a trial position
The geometric centreline limits are L + W/2 and R − W/2. Start a trial between those limits. Leave room on both sides for the variation you actually see when loading and handling a finished carton.
For example, suppose the usable lane on one drawing runs from 18 to 58 mm and the proposed band is 20 mm wide. The geometric centre can lie from 28 to 48 mm. A first sample centred at 38 mm leaves 10 mm to either lane boundary at the band edges. These example dimensions describe a drawing. Actual pack variation and placement repeatability still need a trial.
Check both positions on filled cartons
- Keep one unbanded control. Use the approved carton and actual contents. Identify the carton revision, retail code, scanner and presentation direction. Confirm the control scans in the intended workflow before comparing banded packs.
- Make two position samples. Mark the near and far positions you propose to allow in production, inside the geometric limits. Run a carton at each position with the intended roll. Record the distance from the datum to each finished band edge and photograph the barcode and the band joint.
- Repeat with the difficult pack. Include the smallest carton or the artwork revision that leaves the least space. After normal handling, check whether the band has shifted, obscured clear space, interfered with opening or moved across a second code on another face. Scan the pack in the same orientation as the unbanded control.
- Keep the accepted limits with the order. Record the material, band width, loading direction and the positions that passed. A scan in this trial checks the packing workflow. If a retailer requires a formal barcode verification result, agree the test and acceptance requirement with them separately.
If the code reads before banding and fails afterwards, compare the two photographs for a covered margin, a band joint over the code or a reflection from clear film. Try moving the band into the verified lane before changing the artwork. GS1’s barcode quality checks also cover clear margins, print contrast and scanning through packaging.
Which sample should you send for a bander quote?
For the KPW-SDJ150 paper or OPP banding machine, send a face-on photo with the datum edge, L, R and W marked, the smallest and largest filled cartons, and an image of each protected face. State the number of cartons per bundle and how the operator presents it. If bench space or hand loading sets the limit, use the tabletop small-carton banding checklist. If a logo repeat or printed seam must also land in a specific place, review the pre-printed band configuration with a piece of the intended roll.
Once the lane is confirmed, use the paper and OPP appearance trial to compare the finish on the same carton.